When a roller seizes or drags, you don’t just lose efficiency—you risk belt damage, spillage, and unplanned downtime. Efficient conveyor roller replacement means two things in practice: minimizing Mean Time To Replace (MTTR) without compromising safety, and verifying the installation so you don’t have to touch the same station twice. This guide walks you through a safety‑first, OEM‑aligned procedure you can standardize across lines and shifts.
Before we begin: always defer to your conveyor and idler OEM manuals and your site’s SOPs. Torque values, belt‑lifting methods, and guarding details vary by frame design and jurisdiction.
Safety first: control hazardous energy and stored loads
Start every job with Lockout/Tagout (LOTO) and confirmation of a zero‑energy state. According to OSHA’s energy control standard, teams must use written, machine‑specific procedures, apply lock/tag devices, and verify isolation and dissipation of stored energy before servicing resumes, as outlined in the agency’s guidance in the OSHA Technical Manual on hazardous energy control. For bulk handling conveyors, MSHA also reiterates the need to de‑energize, block against motion, secure the belt, and confirm no power before work, highlighted in its Conveyor Roller Safety Alert.
A quick LOTO checklist (adapt to your SOP):
- Identify all energy sources (electrical, hydraulic, pneumatic) and stored energy (belt tension, gravity).
- Shut down and isolate; apply personal locks and tags at the main disconnect; test to verify zero energy.
- Support or relieve belt load using engineered belt lifters and rated clamps. Never pry or lift manually.
- Maintain communication and barricade the work area; remove and secure guards methodically, accounting for all fasteners.
Restore guarding and remove LOTO only after tools are cleared, fasteners torqued, and a supervisor (per SOP) authorizes re‑energization.
Identify the right replacement parts (and when to replace)
Correct part identification eliminates rework and misfits:
- Idler type: troughing (common angles: 20°, 35°, 45°), impact (rubber disc), return (flat or V‑return), self‑aligning/training, garland/transition.
- Dimensions: roll diameter, face width, shaft/axle size, stand height, and mounting slot pattern; confirm the frame brand/series.
- Bearing/seal: sealed‑for‑life vs. re‑greasable; labyrinth and contact seal styles.
- Duty rating: CEMA class (e.g., B–F) appropriate to load and belt width.
Publicly available OEM materials provide standard angles, classes, and installation pointers—for example, PPI’s Idler Installation & Operation Manual covers alignment and mounting order in detail in the PPI Idler Installation & Operation Manual.
Repair vs. replace? Replace rollers that are noisy, seized, wobbling, show excessive drag, or have damaged labyrinth seals. Persistent bearing heat after a short run can indicate lubrication or seal failure, a theme also discussed in SKF’s bearing failure overview.
Neutral vendor example: in corrosive or wet service, manufacturers such as БизонКонви offer sealed UHMWPE or stainless return rollers; verify diameter, face, shaft, and CEMA class for fit and duty. Keep the selection objective—material choice should match environment and maintenance goals.
Tools and staging for efficient work
Stage all parts and tools before you open a guard. A prepared crew is a fast crew.
- LOTO kit with personal locks/tags; barricade tape or cones
- Certified belt lifter and engineered belt clamps sized to belt width/load (see the Flexco Flex‑Lifter IOM)
- Sockets/spanners, breaker bar, and a calibrated torque wrench
- Alignment aids: string line or laser, straightedge/level, tape measure, feeler gauges
- Penetrating oil, wire brush, rags; anti‑seize for dissimilar metals; threadlocker where OEM specifies
- Paint marker for torque witness marks; tag ties for hardware retention
Pro tip: pre‑kit idler stations (correct trough angle, roll diameters, hardware) in the storeroom so technicians grab one SKU and go.
Step‑by‑step conveyor roller replacement procedure
Use this as a template and adapt details to your frames and SOPs.
-
Plan, communicate, and isolate the area
- Verify the exact station number and part; stage the new idler/roller and hardware.
- Communicate with control room; set up barricades and signage.
-
Execute LOTO and verify zero energy; support the belt
- Lock and tag the main disconnect; attempt a start to confirm isolation.
- Relieve belt tension if your procedure calls for it, or support the belt load with a rated belt lifter and clamps. Avoid pry bars or lifting by hand.
-
Remove guards and inspect the frame
- Remove only the guards necessary to access the station; capture fasteners in a labeled container.
- Inspect stringers/stands for cracks, deformation, or elongation of slots; clean surfaces.
-
Extract the failed roller or idler set
- For return rollers: remove retainers/clips; withdraw the shaft carefully. For troughing sets: loosen stand bolts; support the assembly while extracting.
- If seized, apply penetrating oil and allow time; use gentle persuasion. Escalate to heat or a puller per SOP if required—avoid damaging the frame.
-
Inspect mounting points and adjacent components
- Check slots and brackets for wear; dress lightly if needed. Confirm no buildup on belt that will affect seating.
-
Install the replacement and align
- Seat the roller shaft fully in hangers (return) or place the troughing set into the stand; install hardware finger‑tight only.
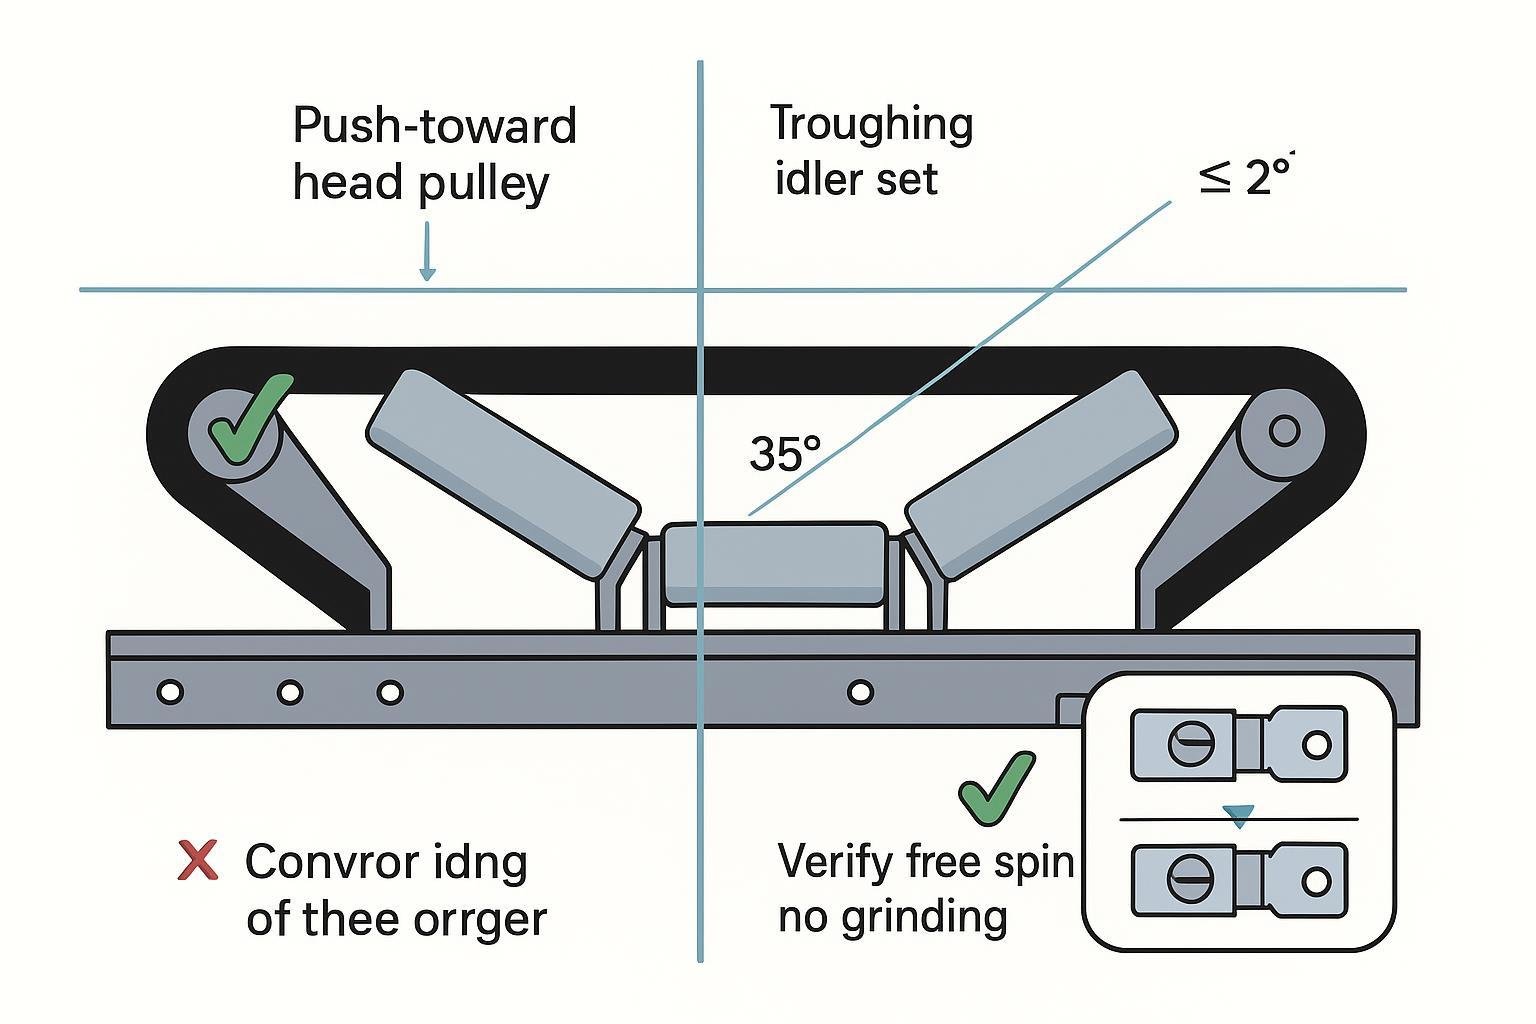
- Align square to the conveyor centerline using a string/laser; set equal belt‑edge distances left/right. For troughing sets, match the specified trough angle and stand height.
- If your design calls for a slight tracking bias, slide both sides in the direction of belt travel toward the head pulley before final torque, per OEM practices highlighted in the PPI Idler Installation & Operation Manual.
-
Torque fasteners and mark
- Torque per OEM spec for bolt size/grade and frame; do not rely on generic charts unless approved by engineering.
- Apply a paint witness mark across the bolt head and structure for visual QA.
-
Restore, test, and observe
- Remove belt lifters/clamps safely; reinstall and secure guards.
- Clear all tools; remove personnel; follow your LOTO removal procedure.
- Run at low speed if possible; observe tracking, noise, and contact. After 15–30 minutes, check bearing housings for abnormal temperature rise.
Alignment and acceptance checks (don’t skip these)
Here’s the deal: most repeat visits happen because alignment or torque was rushed. A few quick measurements close the loop. ASGCO’s tracking guidance underlines that idlers should be square to centerline and level to prevent wander; see the installation concepts summarized in ASGCO’s tracking principles (World Coal excerpt).
- Squareness and level: With a string/laser, verify the idler is perpendicular to the conveyor centerline and level. Edge‑to‑center distances should match side to side.
- Tilt limits: Keep tilt within small limits (commonly ≤2°) to avoid uneven wear, consistent with practices in PPI’s idler instructions.
- Free spin: Each roll should spin smoothly with no grinding or wobble.
- Tracking: During the run test, the belt should remain centered with no edge rubbing; train with dedicated trainers if needed. Martin Engineering covers root causes and fixes in its belt mistracking guide.
- Thermal check: Touch or use IR to confirm no abnormal heat rise at bearings after 15–30 minutes; heat suggests sealing or lubrication issues.
Two‑minute acceptance table you can print and laminate:
| Checkpoint | What “good” looks like | How to verify |
|---|---|---|
| LOTO & zero energy | Isolation complete; no motion possible | Attempted start test; meter checks per SOP |
| Squareness to centerline | Left/right edge distances equal | Tape measure against a string/laser line |
| Level and tilt | Bubble within limit; tilt ≤2° | Level on rolls; inclinometer if available |
| Free spin & noise | Spins freely; no grinding/wobble | Manual spin check; listen/feel |
| Fastener torque | Per OEM spec; marked | Calibrated torque wrench; paint mark |
| Tracking | No edge contact; minimal wander | Visual during run test |
| Bearing temperature | No abnormal hot spots | Hand/IR after 15–30 minutes |
| Guards | Installed and secure | Physical tug test |
Troubleshooting after conveyor roller replacement
If the belt misbehaves right after the change, use this quick triage:
- Carry‑side wander near the repair: Re‑check squareness/height of the last two idler sets; clean buildup; verify centered loading at chutes. Consider a trainer placed upstream of the problem zone; Martin’s guidance in the mistracking overview outlines root causes.
- Return‑side wander: Ensure return idlers are level/perpendicular; remove carryback; verify any self‑aligning returns are oriented toward the head pulley per the PPI Idler Installation & Operation Manual.
- Noise/drag from the new roller: Inspect for seal damage or contamination; if sealed‑for‑life, replace—do not attempt to grease.
- Immediate heat at bearings: Suspect misalignment causing axial loads, or a defective seal; replace and realign, then re‑test.
Efficiency boosters and error‑proofing
- Stage “idler kits” by station with the correct trough angle, roll sizes, fasteners, and guard hardware.
- Use engineered belt lifters and clamps sized to the belt; improvised lifting is slow and dangerous. Flexco’s IOM spells out rated capacities and setup in the Flex‑Lifter installation guide.
- Standardize torque practices: a posted chart that references OEM specs, plus paint marks across fastener heads, prevents misses.
- Use simple alignment aids (string/laser) and record edge distances on the work order for quick audits.
- Track MTTR, tracking stability, and bearing temperature deltas to quantify improvements.
Documentation and follow‑up
Good records prevent repeat failures and help procurement stock the right spares.
- Log station number, part/serial numbers, dimensions, CEMA class, date/time, technicians, and torque verification.
- Note run‑test observations (tracking, noise) and bearing temperature after 15–30 minutes.
- Schedule a follow‑up inspection next shift to re‑check torque paint marks, tracking, and guard security.
Why this process works
Think of your conveyor like a long, lightly‑steered train: if a single wheelset (idler) is skewed or dragging, the whole consist starts to wander and heat up. Controlling energy, installing square and level, and validating torque and temperature gives you fast, repeatable conveyor roller replacement without the callbacks. And that’s the simple definition of efficiency: doing it once, safely, and moving on.
References (selected): OSHA’s energy control program in the OSHA Technical Manual; MSHA’s Conveyor Roller Safety Alert; PPI Idler Installation & Operation Manual и PPI Idler Instructions; ASGCO tracking principles; Flexco Flex‑Lifter IOM; Martin Engineering’s mistracking guide; SKF bearing failure overview.