Choosing between impact rollers (impact idlers) and impact beds in a conveyor loading zone is rarely a one-size-fits-all decision. The right call depends on impact energy, belt protection and sealing needs, retrofit constraints, maintenance windows, and total cost of ownership (TCO). This guide puts both solutions on equal footing and shows where each shines—and where a hybrid approach can be the practical middle ground. If you’re specifically comparing impact rollers vs impact beds for a 2026 project, use the frameworks below to align with current vendor guidance and field practices.
What each solution does
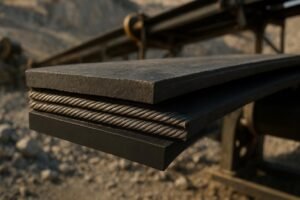
Impact rollers (impact idlers) are carrying idlers fitted with energy-absorbing rubber rings that cushion localized hits from falling material. They’re commonly used in skirted load zones with reduced idler spacing to control sag. Multiple manufacturers describe them as suitable for light-to-moderate impact loads and as a lower-capex, easy-to-retrofit option. For background, see the manufacturer definitions in the Luff Industries catalog and other idler references cited later.
Impact beds (impact cradles) are full-support structures that replace roll contact with resilient impact bars. A low-friction UHMWPE top slides under the belt while the rubber/urethane core absorbs shock. Beds stabilize the belt line for sealing, reduce sag, and control spillage and dust—benefits emphasized in vendor materials like Martin Engineering’s impact cradle datasheet and Flexco’s DRX series pages.
Quick comparison: impact rollers vs impact beds
Below is a practical, side-by-side view of how the two solutions differ. Use it as a map, then scroll into the scenario guidance for context.
| Dimension | Impact Rollers (rubber-disc idlers) | Impact Beds (UHMWPE impact bars) | Hybrid approach |
|---|---|---|---|
| Coverage under belt | Point contact at idler locations; sag control via tighter spacing | Continuous full support across the loading zone | Bed at primary impact, rollers at entry/exit |
| Belt protection | Good for light–moderate impacts; less splice/cover protection under severe duty | Strong protection against puncture/tear; stabilizes belt for sealing | Use bed where hits are highest, rollers to ease transitions |
| Spillage & dust | Limited sealing stability if sag persists | Superior sealing stability; typically lower spillage/dust | Bed improves sealing; rollers help at transitions |
| Maintenance | Replace worn discs or seized idlers more often in severe duty | Replace impact bars when UHMW top wears near rubber; condition-based intervals | Balanced service distribution |
| Energy/friction | Rolling contact; minimal added drag | Sliding contact; drag increases if bars set too high or surfaces rough | Correct transition/alignment to minimize drag |
| CapEx vs OpEx | Lower CapEx; higher OpEx if impacts are harsh | Higher CapEx; often lower OpEx via fewer failures and better containment | CapEx focuses on the highest-impact area |
| Retrofit complexity | Simple to add/replace; fits tight spaces | Requires space and correct transition geometry | Combine where structure allows |
| Best fit | Light-to-moderate impacts, budget retrofits | Heavy-duty, high drop height/lump size, chronic spillage | Real-world standard in many mines/quarries |
Scenario-based guidance
Heavy-duty, high drop height, large/sharp lumps
If you’re seeing gouged covers, damaged splices, bent idler frames, or constant cleanup at a primary crusher feed, impact beds typically deliver better outcomes. Full support reduces belt deflection so skirt sealing works, spillage falls, and idlers downstream survive longer. Vendors position beds for severe-duty zones such as ROM rock transfers; see the emphasis in resources like the Martin Engineering impact cradle datasheet and Flexco DRX documentation.
Medium-duty with variable feed and moderate drop height
Ports, agri/grain, or mixed feed plants often benefit from a hybrid: an impact bed under the highest-energy portion of the loading zone and impact rollers flanking it at the entry and exit. You get stable sealing where you need it most, without overbuilding the entire zone.
Light-duty or budget-limited retrofit
When drop height is low and material is fine or moderately sized, impact rollers may be sufficient. Their lower upfront cost and modular replacement make them sensible where space is tight or access is limited, and where sealing performance is acceptable with tighter idler spacing.
Chronic spillage/dust complaints or repeated idler failures
Beds, combined with properly set skirting, usually resolve these pain points faster than more idlers alone. Stabilizing the belt line reduces gaps at the skirtboards, controlling fugitive material and dust. This approach is reinforced across vendor foundations and dust containment guidance.
Limited maintenance windows and high cost of downtime
If stopping the line is expensive or difficult, a bed can extend intervals between interventions by eliminating the cascade of failures that starts with poor support and sealing. That said, proper installation and alignment are non-negotiable to avoid unnecessary drag.
Installation and transition best practices
Here’s the deal: the performance difference between a great bed and a frustrating bed often comes down to transition geometry and bar height.
- Match trough angle and width. Follow recognized transition guidance so the belt reaches full trough before the bed; avoid abrupt profile changes that spike friction. Industry documents from Richwood and Martin highlight this geometry.
- Set center bars slightly below the unloaded belt line. A common practice is about 13 mm (½ inch) below, with wing bars aligned to adjacent troughing idlers. This keeps sliding contact controlled and reduces energy draw.
- Keep free-belt edge distances adequate under skirtboards. Typical guidance calls for at least several inches of free edge on each side to prevent pinching and heat. Martin’s Foundations resources discuss skirtboard width and edge distances.
- Smooth entry/exit with impact rollers. Place impact idlers immediately before and after the bed to ease transitions, particularly in short loading zones.
- Verify drive power and alignment. UHMWPE offers low friction, but mis-set bars or rough surfaces increase drag. Check alignment and surfaces during commissioning.
According to vendor datasheets and practice guides, these steps are routine but critical. They’re small adjustments that pay back in uptime.
Maintenance expectations and replacement cues
- Impact rollers: Inspect frequently in high-impact zones. Replace idlers with cracked or missing discs, seized or noisy bearings, or damaged frames. Condition-based checks weekly to monthly are common in severe duty.
- Impact beds: Inspect impact bars for even support and wear. Replace bars when the UHMWPE top wears near the rubber/urethane core or grooves/dishing appear. Confirm fasteners are tight and surfaces smooth.
Most manufacturers stop short of fixed time intervals because operating conditions vary. Instead, fold these items into your preventive maintenance program and track condition trends.
TCO snapshot: balancing CapEx, energy, and uptime
Think of TCO in two parts: what you pay upfront and what the system demands over years of operation.
- Upfront: Impact rollers are sold per roll or per set and tend to be significantly cheaper per meter of loading zone than beds. Beds are priced per cradle and cost more initially.
- Ongoing: Under severe duty, rollers can fail more often—bearing seizures, disc damage—while beds improve sealing, reduce spillage cleanup, and protect belt covers and splices, cutting downstream replacement costs.
- Energy: Rolling contact adds little drag. Beds introduce sliding contact; if bars are set correctly and UHMW surfaces are smooth, added drag is manageable. Misalignment or high bar settings increase draw.
An illustrative, conservative example: If a site installs one 1.5 m bed segment to stabilize sealing at a primary impact and complements it with two impact idler sets at entry/exit, the incremental CapEx may be 3–5× higher than rollers-only in that segment. However, if sealing reduces cleanup labor and idler replacements enough to save tens of hours per quarter—and prevents one belt splice repair—the payback often lands within a year or two. Actual figures vary; request RFQs and normalize cost per meter of loading zone. In short, when you evaluate impact rollers vs impact beds through the lens of avoided downtime and safer housekeeping, beds often pencil out in severe-duty zones.
For vendor perspectives on life and containment improvements, review manufacturer guidance such as Martin Engineering’s impact cradle datasheet, Flexco DRX documentation, and Luff Industries’ blog articles on beds and slider beds.
Also consider: sourcing components
Disclosure: BisonConvey is our product. If you’re specifying heavy-duty impact idlers or need system-level compatibility across belts, idlers, pulleys, and rollers, BisonConvey manufactures premium conveyor belts and integrated components engineered for demanding environments. Learn more at BisonConvey.
How to choose, in practice
Start with impact energy (lump size, drop height, belt speed/width) and ask whether sealing is consistently failing in the loading zone. If impacts and sealing problems are severe, a bed is usually the anchor of the solution; if impacts are mild and budget tight, impact rollers may suffice. Many plants combine both to target the highest-energy section and smooth the transitions.
One last question to pressure-test your choice: If you cut your cleanup time and idler failures in half, would the higher CapEx of a bed pay back within your downtime cost model? If the honest answer is yes, you likely have your direction. And if you’re still weighing impact rollers vs impact beds, sketch your load-zone profile and plot the highest-energy section—that’s where the right support makes the biggest difference.
References and further reading
- Manufacturer definitions and catalogs for idlers and beds are available in documents like Luff Industries’ 2024 catalog.
- Installation and geometry guidance appears in Martin Engineering’s Impact Cradles datasheet and Flexco’s DRX bed pages.
- Transition and containment best practices are discussed in Richwood’s load zone solutions overview and Martin Foundations resources.