
How to fix conveyor belt misalignment: a field troubleshooting guide
Diagnose belt mistracking fast: head/tail drift, hunting, transfer chute checks, and safe step-by-step fixes for mining conveyors.
Conveyor belt misalignment (often called mistracking) is rarely “just a belt problem.” In mining systems—long overland runs, underground galleries, and multi-chute transfer lines—small issues compound fast: edge damage, spillage, dust, and the kind of unplanned downtime that drains maintenance hours and puts people in risky positions.
This guide is written for engineering and maintenance managers who need a safe, repeatable way to diagnose tracking issues—including the three symptoms you described:
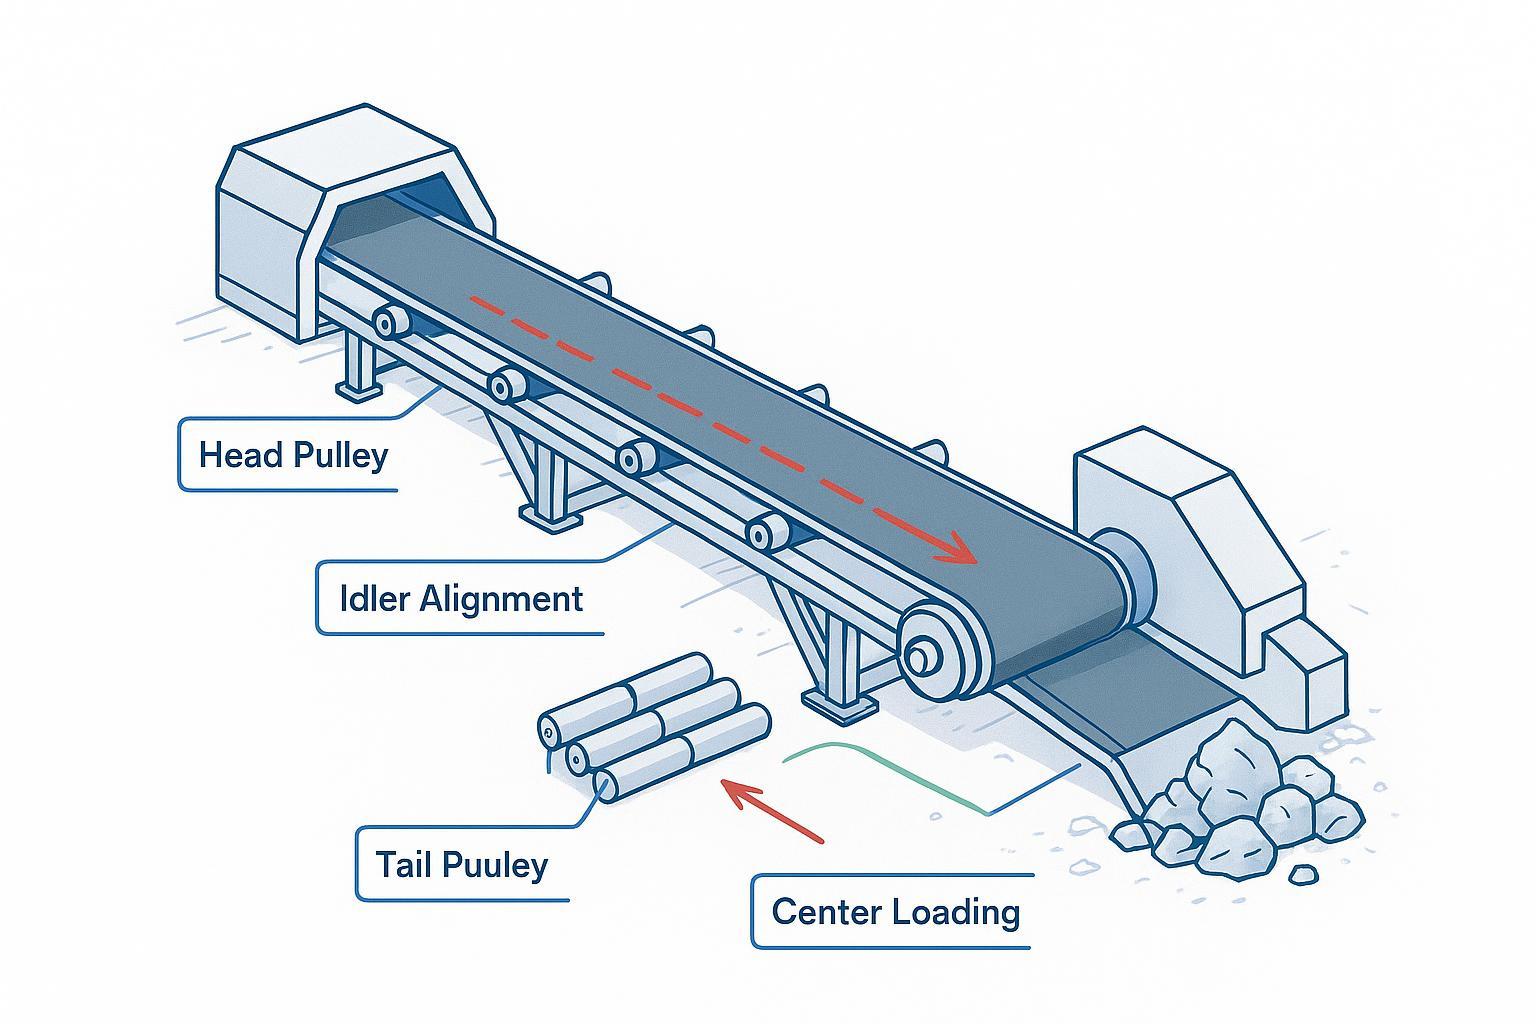
The belt walks to one side at the head pulley
The belt walks to one side at the tail pulley
The belt hunts (drifts side-to-side)
⚠️ Warning: Tracking work puts people near nip points, stored energy, and falling material. Use your site’s lockout/tagout and guarding procedures. If you must observe the belt running, do it from designated safe points.
First, agree on the basics (so adjustments make sense)
A tracking adjustment is not magic—it’s physics.
The belt tends to move toward the side/end of a roll or idler it contacts first (a widely used rule-of-thumb in belt training).the rule that the belt moves toward the end it contacts first
Martin Engineering describes belt behavior similarly: belts migrate toward the side where friction is “reached” first or is greater.Martin Engineering’s belt behavior basics
We’ll keep the citations to one-per-idea below to avoid repeating the same sources over and over, while still keeping the key claims tied to reputable references.
What that means in practice: one skewed idler, one seized roller, one buildup ridge on a pulley, or one off-center chute stream can steer the belt for hundreds (or thousands) of feet.
Step-by-step workflow: diagnose first, then correct (in the right order)
If you adjust the wrong thing first, you can waste hours (or make the belt “hunt” instead of stabilizing). Use this sequence.
Step 1: Observe the belt empty, then loaded
Action: Run the belt empty at normal speed (if your procedures allow safe observation). Then observe under normal load.
Look for:
Where does the belt first start walking off center—near the tail, after a transfer, or only close to the head?
Does it only mistrack under load (loading/chute issue) or empty too (alignment/buildup/component issue)?
Done when: You can point to the first location where the belt begins to drift.
Step 2: Clean and inspect before you touch alignment
Action: Remove carryback and buildup from:
pulleys (especially the return-side surfaces)
return idlers
loading zones and skirting
Then check for the “usual suspects”:
seized or dragging rollers
damaged idler frames
missing/loose fasteners
belt edge wear that indicates structure contact
Why this is early: Material accumulation on rolling components is a common mistracking driver.
Done when: All rotating parts you inspected spin freely and contact surfaces are clean enough to rule out a one-sided “friction ridge.”
Step 3: Square the anchors (tail + head pulleys, take-up travel)
Tracking devices can’t compensate for a conveyor that isn’t square.
Action: Verify that:
tail and head pulleys are square to the conveyor centerline
the take-up (gravity or screw) tracks straight through its travel and doesn’t bind or rack
the structure isn’t twisted or settled relative to its base
Done when: Pulley alignment and take-up travel are mechanically credible (not “close enough by eye”).
Step 4: Fix the loading problem before “training” the belt
If the belt mistracks mainly after a chute or transfer, treat it as a loading problem until proven otherwise.
Action: Inspect the transfer(s):
Is the material stream centered?
Is the chute feeding at an angle that pushes the belt sideways?
Are skirts worn unevenly or rubbing one side?
PROK highlights off-centre loading at the chute as a major mistracking driver in mining and notes that high-tension zones amplify small issues.PROK’s mining-focused mistracking root causes
Done when: Loading is centered and symmetric enough that the belt isn’t being “steered” by the ore stream.
Step 5: Tune idlers (small moves, one location at a time)
Once anchors + loading are addressed, you can start training the belt with idlers.
Action:
Start upstream of where mistracking begins, not at the very end where it’s already far off.
Make small adjustments and let the belt make several revolutions before deciding whether it worked.
Avoid creating a “zig-zag” of idler corrections that fight each other.
Done when: The belt stabilizes near center and stays stable empty and loaded.
Pro Tip: If the belt is damaging edges or contacting structure, prioritize stopping the damage (cleanup + remove a seized roller + re-center loading) before chasing perfect tracking.
Symptom playbooks for conveyor belt misalignment (head, tail, and hunting)
If the belt walks to one side at the head pulley
What it usually points to:
Off-center loading upstream (especially transfers) pulling the belt over
Carryback/buildup on return components creating one-sided friction
A belt splice or belt defect that becomes more visible in high-tension zones
Checks (in order):
Confirm the belt tracks reasonably empty. If it only walks under load, go straight to transfer/loading checks.
Inspect and clean the return side approaching the head: pulley lagging condition, carryback, and any “build-up crown.”
Verify head pulley squareness to centerline (don’t “steer” with the drive pulley unless you’re correcting a true alignment error).
Inspect splice squareness and stiffness transitions—poor splices are a recognized mistracking cause.Martin Engineering’s causes of conveyor belt mistracking
Fixes that tend to work:
Center the chute stream and stabilize the loading zone.
Eliminate carryback and keep the return path clean.
Replace seized rollers and correct any obviously skewed idler frames.
Verify: After each correction, run empty first, then loaded, and watch the belt at the same observation points.
If the belt walks to one side at the tail pulley
What it usually points to:
Tail pulley not square to the conveyor centerline
Take-up racking or binding through its travel
Belt feeding onto the tail off-center (return idlers skewed, buildup, or structure twist)
Checks (in order):
Confirm the tail pulley is square and level relative to the centerline.
Inspect take-up travel and ensure it stays aligned under load changes.
Inspect the return belt leading into the tail for one-sided friction (buildup or a dragging roller).
Fixes that tend to work:
Re-square the tail pulley and correct structural twist.
Repair/adjust the take-up so it travels straight.
Verify: If the tail is square and clean, a properly tensioned belt should enter the tail consistently.
If the belt “hunts” (drifts side-to-side)
What hunting usually indicates: an inconsistent steering force—often a splice, intermittent buildup, uneven tension, or shifting load at a transfer.
Checks (in order):
Identify whether hunting repeats at the same belt location (mark the belt and watch the splice pass).
Inspect splice condition: squareness, thickness steps, offsets, and stiffness transitions.
Check tension consistency and take-up behavior through load changes.
Inspect transfers for surging or shifting load (segregation of lumps/fines can move the center of mass).
Fixes that tend to work:
Correct the splice if it’s not square or has a pronounced geometry step.
Stabilize the load at transfers (centered stream, controlled feed, repaired skirting).
Remove the intermittent friction sources (buildup, seized roller).
Verify: Hunting should reduce after the splice passes and the belt should settle toward center instead of oscillating.
Transfer chutes: the fastest place to create (or fix) mistracking
On systems with multiple chutes, assume you have multiple opportunities to steer the belt.
High-value checks:
Center the material stream and keep it consistent.
Ensure skirt rubber doesn’t bias the belt (uneven wear and constant contact on one side is a steering force).
Clean carryback early—carryback feeds buildup on return idlers, which then drives mistracking.
Long overland + underground conveyors: what makes tracking harder
Small errors compound: A few millimeters of idler frame skew repeated across a long run becomes a constant steering force.
Structure drift is real: Settling, corrosion, and impacts can twist the centerline over time (a recognized contributor to mistracking).
High-tension zones punish shortcuts: Near the head, small mistracking can turn into edge damage quickly.
When it’s appropriate to use self-aligning idlers (and when it isn’t)
Self-aligning/training idlers can help stabilize a belt—but they’re not a substitute for squaring the conveyor or fixing off-center loading.
If you need an engineering-friendly definition: BisonConvey describes a self-aligning idler that pivots/rotates in response to belt deviation to help guide the belt back toward center; it’s positioned on carrying or return sides and is often used on long-distance or heavy-load systems.BisonConvey self-aligning idler
Use them when:
You’ve corrected the anchors and loading, but you still see slow drift under changing conditions.
You want added stability on long runs where minor variations occur.
Don’t use them to hide:
a crooked tail pulley
a racking take-up
a transfer that loads off-center
Prevent mistracking from coming back (maintenance routine that actually works)
Daily / shift-start checks
Walk critical zones: transfers, tail, head return path.
Look for fresh spillage patterns and early edge contact marks.
Weekly checks
Identify and replace seized rollers early (they behave like brakes and steer the belt).
Verify idler frames haven’t shifted after reactive maintenance.
After any major maintenance (belt change, splice, pulley work)
Re-verify pulley squareness and take-up travel.
Run an empty observation cycle before returning to full load.
Next steps (low-commitment)
If you want a second set of eyes on your tracking issue, a practical approach is to document:
where the mistracking begins (station number / distance marker)
whether it happens empty vs loaded
photos of the tail/head pulleys, take-up, and transfer points
Then request a component and layout review for the specific zones you’re correcting. For example, you can reference BisonConvey’s overview of BisonConvey pulleys and idlers overview when discussing bend pulleys, lagging, and idler options relevant to stability.