Conveyor belt slippage is simple to spot—your head pulley turns, but the belt lags behind. The impact isn’t simple: lost throughput, heat that can glaze covers and weaken splices, and in the worst cases, friction hot spots that threaten fires. Here’s the deal: you’ll fix most slippage by restoring clean, dry traction, ensuring adequate slack‑side tension, and increasing wrap angle when geometry allows. This guide lays out a safe, stepwise workflow you can use on heavy‑duty conveyors in mines, ports, cement, steel, power, and agriculture.
Start Safe: LOTO, guards, and housekeeping
Begin with lockout/tagout that meets your site procedure and OSHA 1910.147. Apply and verify isolation, remove guards only as the procedure allows, and keep people out of nip points. For foundational maintenance cautions around conveyors and danger zones, Martin Engineering’s Foundations series is a practical reference; review its safety excerpts before hands‑on work to reinforce good habits. See OSHA’s core control of hazardous energy rule in the United States for the baseline legal framework. According to the OSHA standard described in the agency’s own materials, devices must be applied and verified, and shift handoffs documented; treat those steps as non‑negotiable. If you operate outside the U.S., follow your local regulations and standards that govern energy isolation and machine safety.
Once safe, start housekeeping. Clean the belt and the drive pulley surface so you’re not diagnosing through a film of mud, moisture, or carryback. As Martin Engineering notes in its carryback guidance, restoring effective belt cleaning reduces contamination at the head and returns traction where it belongs.
- Sources: OSHA’s official standard for energy control is summarized in the agency’s public pages under “Control of Hazardous Energy (Lockout/Tagout).” A practical, industry‑specific safety view appears in Martin Engineering’s Foundations materials. For carryback prevention and cleaning solutions, Martin’s solution pages are a useful orientation.
Quick, visual diagnostics (5–10 minutes)
With the area clean and still under LOTO, take a slow lap around the head station and take‑up. Look closely at the drive face, belt, and geometry. You’re looking for visual cues that separate “traction problem” from “power or geometry problem.”
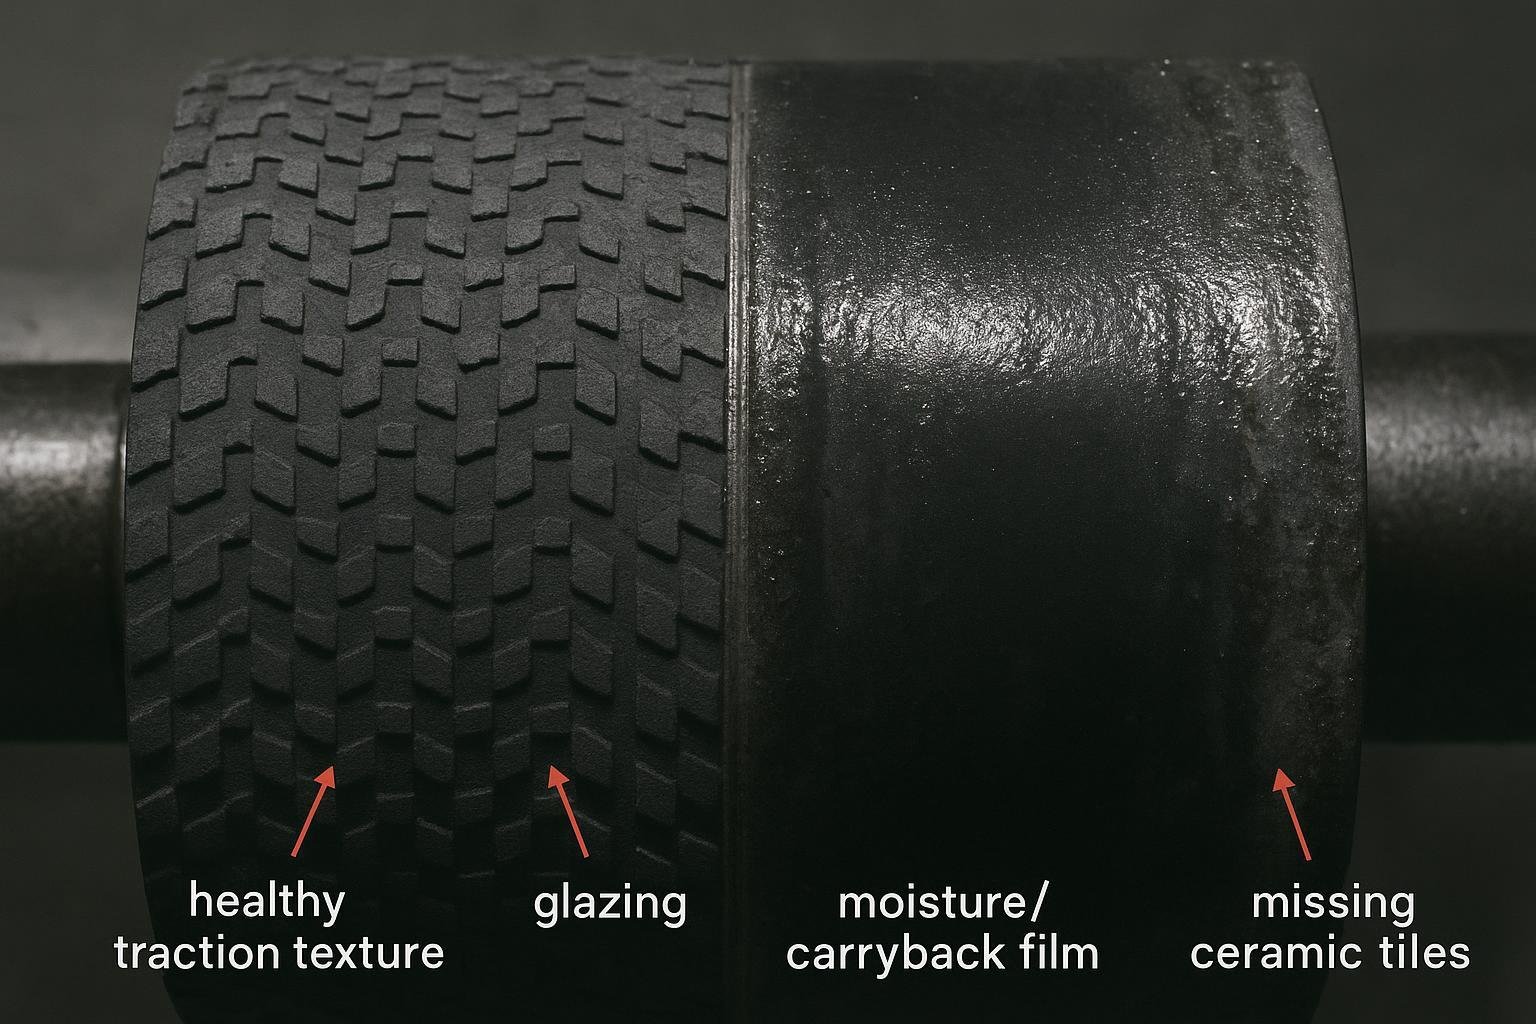
- Pulley lagging condition: a healthy surface shows texture (patterned rubber or ceramic). A smooth, shiny, or tile‑missing surface points to end‑of‑life or the wrong compound for the environment. If you see a wet sheen, expect low friction and likely conveyor belt slippage under load.
- Belt cover glazing: a hard, glassy look on the drive side signals heat from previous slip. Note it, because even after fixes, glazed covers can remain traction‑poor until worn off.
- Take‑up position: gravity counterweights bottomed out, or screw take‑ups at the end of travel, mean you’ve run out of tensioning range.
- Idlers near the head: seized or misaligned rolls add drag and can distort loading across the belt’s width, reducing effective traction.
- Loading pattern: off‑center or overloaded chutes create uneven tension fields. If material is striking the belt just ahead of the head drive, that impact can also disrupt traction.
Measure what matters
Field fixes stick when they’re based on a couple of simple measurements and observations. You don’t need a finite‑element model—just reliable ways to quantify what you see.
Wrap angle and why it changes the game
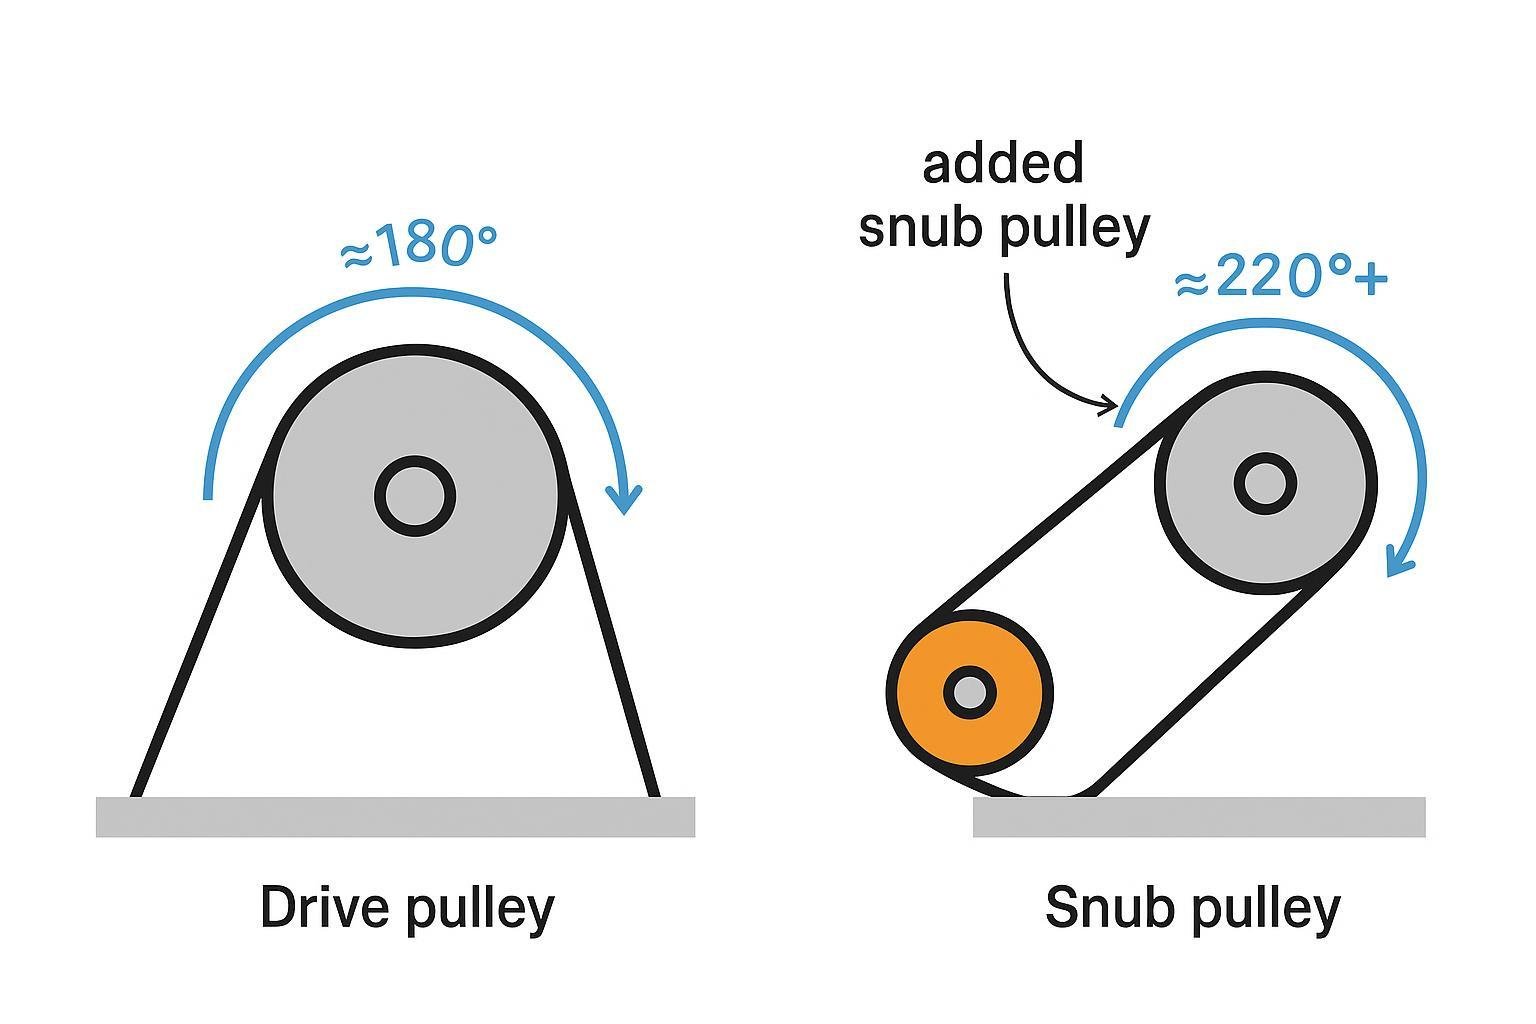
Wrap angle is the arc of belt contact around the head pulley. More wrap increases available frictional grip for a given slack‑side tension (commonly called T2). If you’ve got a single head drive with roughly 180° of wrap and a manual take‑up, you’ll need higher T2 than a layout with a snub pulley that bumps wrap above ~200°. Rulmeca’s technical notes on belt tensions and wrap factors explain why layouts with greater total wrap (e.g., dual drives approaching ~420° combined) can run with far lower required slack‑side tension for the same torque—often the decisive lever when wet or icy conditions erode friction.

As a practical target, if geometry allows, aim for at least ~200° at the head drive. Use a simple protractor app or angle gauge to estimate the arc, and document your reading for future comparison. If you’re already near that level and still seeing conveyor belt slippage, focus on traction (lagging and contamination) and tension delivery (take‑up) next.
- Reference: For a readable discussion of wrap and its influence on required tension, see Rulmeca’s public article on solving slippage and its separate belt tension calculation primer, which includes wrap‑factor examples grounded in industry practice.
Tension and take‑up checks
Take‑ups exist to keep T2 in the window your drive needs. Gravity take‑ups (GTUs) do it automatically; screw take‑ups need careful, even adjustment. When slippage appears, the most common take‑up problems are bottomed‑out travel, binding from debris, and uneven screw adjustment.
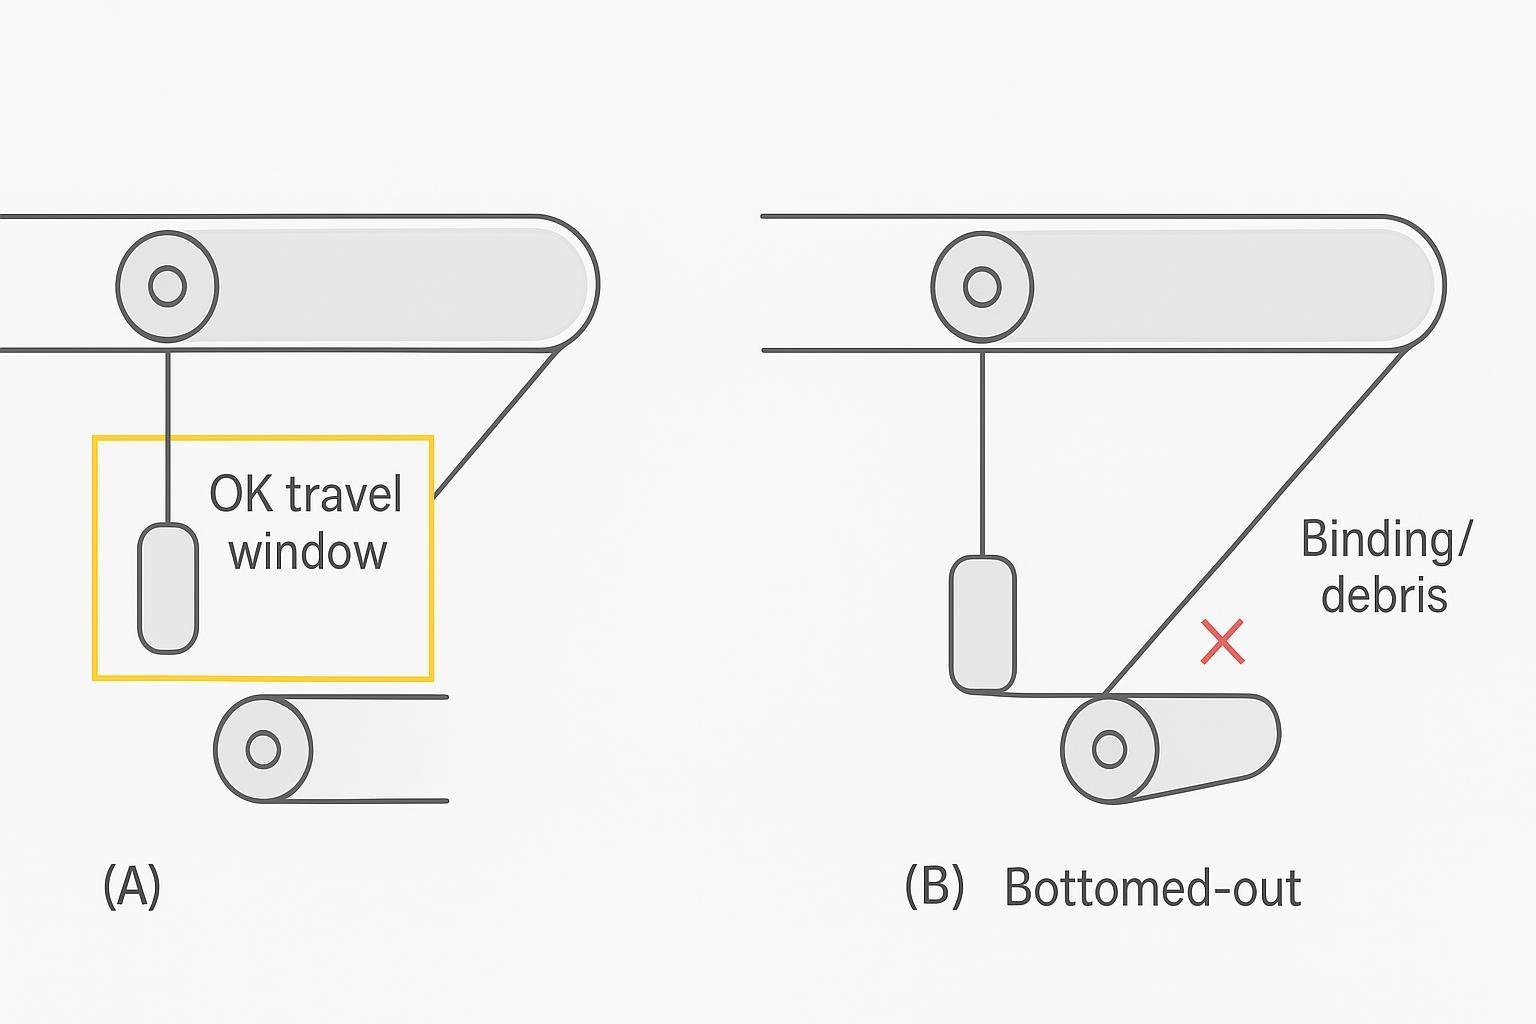
Confirm the GTU counterweight is mid‑travel in its design window. If it’s bottomed out, restore range by cleaning and, if necessary, re‑establishing belt length (e.g., remove a section or re‑splice per OEM guidance). On screw take‑ups, back off to even the sides, clean threads and slides, and re‑tension in small, symmetric turns while checking belt sag and tracking under load. FEECO’s public notes on take‑up options and troubleshooting offer clear, practical descriptions of both systems and common failure modes.
Two quick proxies help you judge if tension is in range before you take the line back to full production: belt sag on the return (excessive sag suggests low tension) and the take‑up’s ability to move freely (binding or side‑loading wastes T2).
Speed comparison and slip monitoring
The most reliable way to prove or disprove slip is to compare pulley shaft speed to belt speed. Do it temporarily with a handheld tach on the head shaft and a wheel or optical pickup on the belt. For ongoing protection, add encoders or prox sensors and program the controller to alarm or trip when differential exceeds your setpoint. Vendors like 4B and Siemens describe differential speed detection that compares head and belt speeds directly; they also recommend programmable setpoints and sensible time delays to avoid nuisance trips on startup. Don’t rely on motor current alone—it reflects load, not traction.
Quick fixes to stop conveyor belt slippage
Because contamination and tension loss drive most conveyor belt slippage, you can often recover traction quickly with targeted maintenance.
Start by restoring belt cleaning and returning the drive interface to a clean, dry state. Martin Engineering’s carryback resources emphasize primary and secondary cleaners (and a wash box where water is acceptable) to keep the belt face consistent. Next, verify the take‑up functions through its travel and adjust tension within OEM specifications—never while running. On screw systems, adjust evenly; on GTUs, ensure the counterweight can move and hasn’t bottomed out.
Replace seized or misaligned idlers near the head and in the take‑up zone. A few locked rollers can add surprising drag, which steals available torque and warms the belt surface. While you’re there, scan the loading chute: if you see off‑center impact or overloading, adjust baffles or flow so the belt isn’t fighting a lopsided load as it meets the drive.
If your pulley diameter is at the minimum limit for the belt and splice, understand that small diameters can reduce effective contact and worsen traction in marginal conditions. In borderline cases, a larger head pulley (within belt manufacturer limits) modestly improves the interface.
Engineering solutions when slippage persists
When cleaning, basic tensioning, and idler replacement don’t hold under real load or weather, move to engineering controls that increase frictional grip or reduce the grip you need.
Re‑lag the drive pulley (rubber vs. ceramic)
Lagging refreshes traction and sheds water. Rubber patterns (diamond, herringbone) are versatile for dry to moderately wet service. Ceramic lagging excels in wet, muddy, or highly abrasive environments because the embedded tiles bite through water films and resist wear. Flexco’s public technical guide explains selection and tile coverage options; ASGCO’s ceramic lagging pages provide material characteristics and application examples.
| Environment | Lagging type | الإيجابيات | Considerations |
|---|---|---|---|
| Dry to moderately wet | Patterned rubber | Good traction, easier install, cost‑effective | Can hydroplane in heavy water; wears faster in high abrasion |
| Wet/abrasive, muddy | Ceramic tiles (various coverages) | High friction in wet, long wear life | Higher cost; ensure correct tile coverage and install |
Choose the compound and coverage with your conditions and budget in mind. If you see persistent hydroplaning or returning moisture at the head, ceramic on the drive pulley is often the durable fix.
- Reference: See Flexco’s open technical guide on pulley lagging selection and ASGCO’s ceramic lagging pages for application notes and case examples.
Increase wrap: snub pulley or dual drives
If geometry allows, add a snub pulley to raise wrap angle at the head; even 20–40° more can make the difference between chronic slip and stable traction. Keep an eye on belt path, pulley diameters, and clearance to avoid new tracking issues. In very demanding duty, dual drives can lift total wrap dramatically. Rulmeca’s belt tension resources show how increasing wrap reduces the slack‑side tension required for the same torque, giving you more margin when conditions get wet or icy.
Drive resizing or an additional drive
If you’re consistently out of traction and torque, and everything else checks out, your drive may be undersized for today’s loading or speed. Use a reputable calculation program and your site’s design data to assess options for a larger drive or a second motorized pulley. Vendors publish public calculators and primers to frame that conversation before you commission a full engineering study.
Practical example: selecting components for traction
A port conveyor with a single head drive and screw take‑up starts slipping each winter storm. Visual checks show patterned rubber lagging that’s smooth and glossy, return idlers near the head packed with frozen fines, and the screw take‑up cranked to its stops.
The team’s sequence is straightforward. They clean the belt, replace frozen/locked idlers, back off and even out the screw take‑up, then re‑tension under light load. On a dry day, slippage abates—but it returns in blowing snow. At that point, they add a small snub to increase wrap from ~185° to ~220°, and schedule a re‑lag to ceramic on the drive pulley at the next outage. Those two changes reduce the required slack‑side tension in wet conditions and improve friction at the interface. For sourcing, a manufacturer like BisonConvey can provide drive pulleys prepared for ceramic or patterned rubber lagging and matched idlers; the team specifies materials based on environment rather than brand claims, documents the geometry, and verifies clearances.
Verify the fix and prevent recurrence
Don’t call it done until you’ve proven it under load. Bring the line up, then run at typical throughput for at least 20–30 minutes while monitoring head shaft RPM against belt speed. If you’ve installed sensors, enable your differential‑speed alarm/interlock with a sensible delay to avoid nuisance trips on startup. Log readings, ambient conditions, and any observations of moisture or carryback.
To keep conveyor belt slippage from returning, set a short, realistic prevention loop: clean effective primary/secondary belt cleaners, check take‑up travel in the operating window, inspect lagging for wear or contamination, and adjust chute loading to stay centered and within design. In cold or wet climates, plan for drainage, covers where practical, and de‑icing routines. Add speed‑based slip detection to shut down quickly if traction collapses; vendors like 4B and Siemens offer straightforward differential speed devices and monitoring manuals you can adapt to your control philosophy.
Citations and further reading
- Rulmeca’s overview of solving slippage problems outlines how wrap angle and tension interact in the field; its separate belt tension primer provides wrap‑factor context useful for planning changes. See the company’s public article “How to Solve Conveyor Belt Slippage Problems” and “How to Calculate Conveyor Belt Tensions” in its technical library.
- FEECO’s public notes on choosing and troubleshooting take‑up systems describe gravity and screw designs, common issues, and basic remediation steps.
- Martin Engineering’s Foundations safety excerpts and carryback guidance give practical guardrails for safe maintenance and effective belt cleaning that restores drive traction.
- Flexco’s technical guide to pulley lagging clarifies when to choose patterned rubber versus ceramic lagging and how tile coverage affects performance; ASGCO’s ceramic lagging pages provide material specs and usage scenarios.
- For slip monitoring, vendors including 4B and Siemens publish overviews and manuals for differential speed detection devices and programming considerations.
- OSHA’s Control of Hazardous Energy (Lockout/Tagout) rule 1910.147 details how to apply, verify, and remove isolation devices; it’s the baseline safety standard for maintenance on energized equipment in the U.S.
External references with descriptive anchors:
- According to Rulmeca’s public guidance on solving slippage, increasing wrap and ensuring adequate slack‑side tension are the primary levers; see the company’s page titled “How to Solve Conveyor Belt Slippage Problems” at https://rulmecacorp.com/how-to-solve-conveyor-belt-slippage-problems/ and its companion “How to Calculate Conveyor Belt Tensions” at https://rulmecacorp.com/how-to-calculate-conveyor-belt-tensions/.
- FEECO’s explanation of gravity and screw take‑ups, typical problems, and corrective actions appears in “Choosing Between Take‑Up Options for Belt Conveyors” at https://feeco.com/choosing-between-take-up-options-for-belt-conveyors/.
- Martin Engineering’s Foundations safety excerpts on maintenance zones and its overview of carryback prevention are available at https://www.martin-eng.com/sites/default/files/Foundations/Book%20Downloads/F4_D12_S3.pdf and https://www.martin-eng.com/content/solution/452/prevent-carryback.
- Flexco’s open technical guide “The Ultimate Flex‑Lag Technical Guide” provides practical lagging selection details at https://documentlibrary.flexco.com/W1202_The%20Ultimate%20Flex-Lag%20Technical%20Guide_102522.pdf, while ASGCO’s ceramic lagging overview is at https://www.asgco.com/products/ceramic-pulley-lagging.
- For differential speed detection concepts and programming, see 4B’s hazard monitoring technical paper at https://www.go4b.com/usa/technical-support/technical-papers/bucket-elevator-monitoring.pdf and Siemens’ DSD‑3 device manual at https://support.industry.siemens.com/cs/attachments/19160652/spl_0049.pdf.
- OSHA’s Control of Hazardous Energy (Lockout/Tagout) standard is summarized at https://www.osha.gov/laws-regs/regulations/standardnumber/1910/1910.147.
Author’s note on usage: This workflow is intended for trained technicians following site procedures and OEM documentation. Always confirm belt and pulley limits (diameter, tension) with the manufacturer before changing geometry or applying new lagging.