If you only remember one thing from this guide, make it this: a correct conveyor belt splicing procedure starts with safety and ends with verification. The middle—clean preparation, accurate geometry, and controlled curing—determines whether the splice runs for years or fails on start‑up. Below is a practical, shop‑floor SOP you can use as a baseline, with typical parameters referenced to authoritative sources. When your belt manufacturer’s table differs, follow the table.
Safety and Preparations
Every splice begins with energy control and a clean, controlled workspace. Lockout/tagout (LOTO) is non‑negotiable for conveyor servicing. The full legal framework lives in OSHA’s standard; use your site’s machine‑specific procedures and documentation practices alongside it. See the official text in OSHA’s Lockout/Tagout standard 29 CFR 1910.147 for definitions, steps, and inspection requirements.
Quick pre‑job checklist:
- Apply LOTO and verify zero energy (electrical, hydraulic/pneumatic, gravity). Post signs and barriers; confirm guards are removed only where necessary.
- Stabilize the belt: anchor both ends with clamps/come‑alongs; block any gravity hazards. Set up lighting and dust control; keep substrates above dew point.
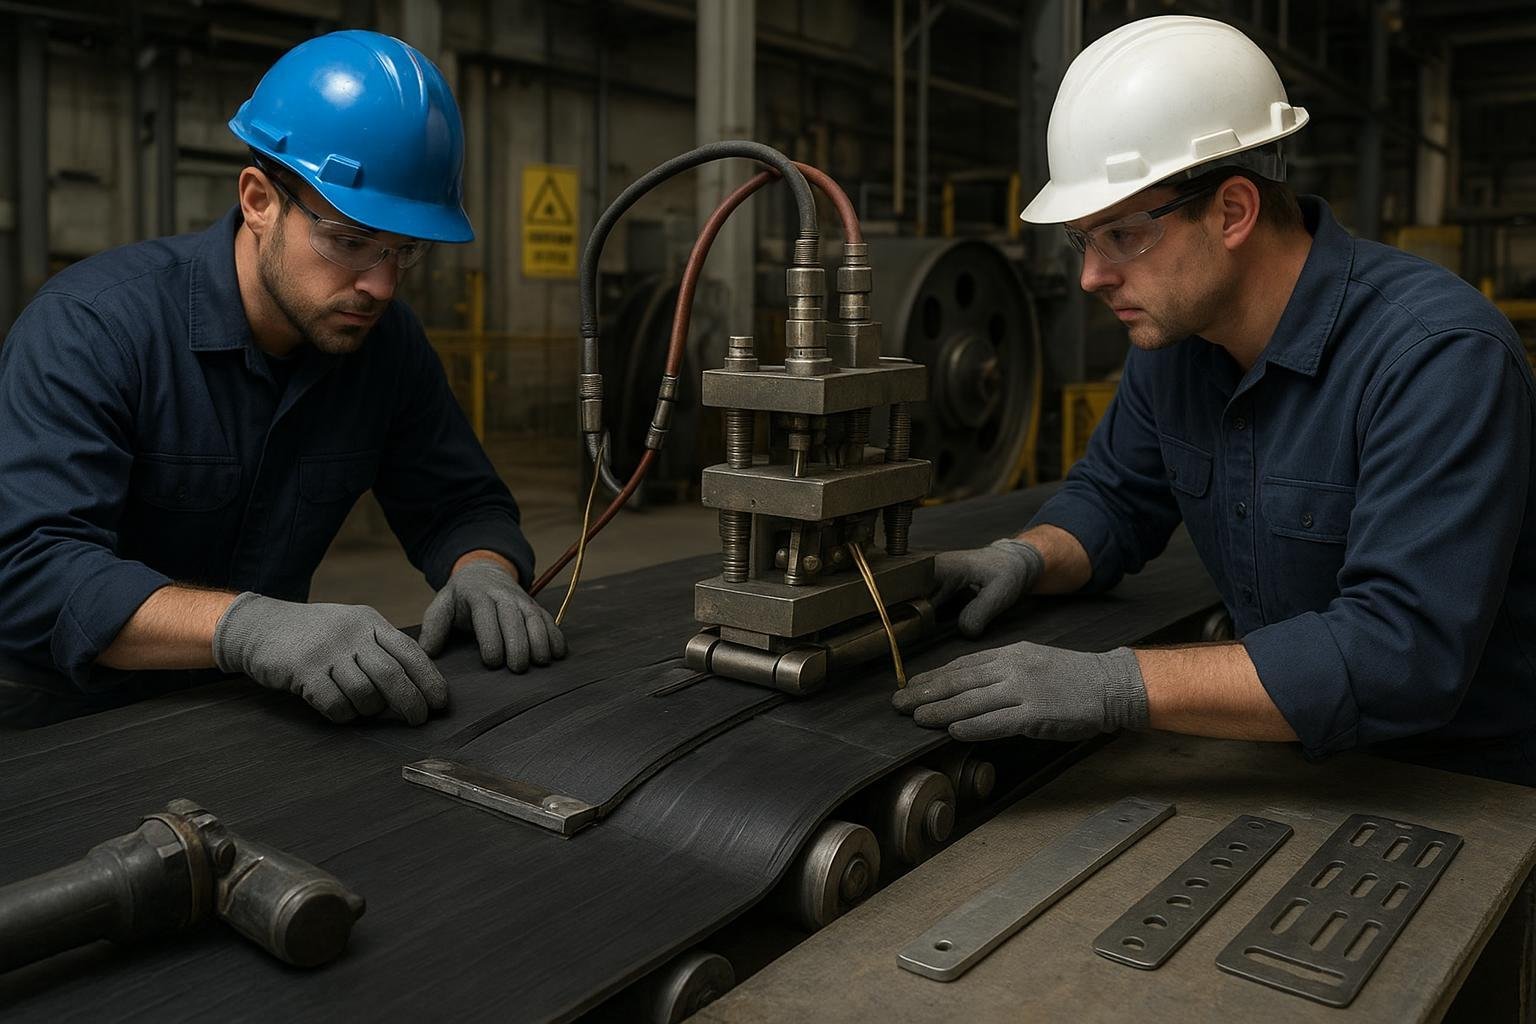
- Confirm PPE: hard hat, safety glasses/face shield, gloves suited to solvents/heat, hearing protection, heat sleeves when hot vulcanizing.
Why push this so hard? Because you can’t get a quality splice in a dirty, humid, or energized environment—full stop.
Choose the Right Splice Type
Selecting geometry and method comes down to belt construction, duty, and site constraints.
- Fabric belts (EP/NN): Multi‑ply belts commonly use hot vulcanized step splices. Some 1–2 ply or straight‑warp constructions (like UsFlex families) are often specified for finger splices, which, when done per template, can retain high strength. For geometry examples and method notes, consult the manufacturer’s instructions such as the Fenner Dunlop UsFlex finger and step splicing guide.
- Steel cord belts: Always follow the belt‑maker’s splice diagram for cord preparation, spacing, and rubber sequence. The essentials—cord alignment, intermediate strips, core/cover plates—are detailed in resources like Semperit’s steel cord belt splicing instructions.
- Mechanical fasteners: Useful for emergencies, frequent length changes, or where curing is impractical. Confirm pulley diameter, belt thickness, and cleaner compatibility in the fastener maker’s manual.
Think of it this way: choose the splice that your belt was designed to accept under your duty and environment, then execute that choice flawlessly.
Tools and Materials
Match tools to method, then validate calibration and condition before cutting.
Hot vulcanized splice essentials: A press with heating platens extending beyond the splice, uniform pressure (air bag or hydraulic), thermocouple/pyrometer, pressure gauges, uncured tie gum and cover rubber strips, release paper, pressure‑compensation cloth as needed, stitchers/rollers, straightedge/laser for alignment, grinders and knives. Typical curing parameters for fabric belts—temperature, pressure, and time—are set out in manufacturer manuals such as the REMA TIP TOP hot splicing manual for fabric belts.
Cold vulcanized splice essentials: Adhesive system (e.g., SC4000 cement with E40 hardener) with accurate mix ratio and pot‑life control, primers/solutions, rollers/stitchers, clamping and alignment tools, grinders/knives, and reliable environmental control (generally 50–104°F / 10–40°C with humidity limits). Detailed mixing and bonding instructions are provided in the REMA TIP TOP SC4000 bonding procedures.
Finger/step templates, steel cord clamps, and thickness gauges round out the kit. Keep a clean table for rubber build‑up; bag and label consumables to avoid cross‑contamination.
Step‑by‑Step Conveyor Belt Splicing Procedure
Below is a consolidated conveyor belt splicing procedure for fabric belts. Where choices diverge, you’ll see two branches: hot vulcanized or cold vulcanized. Use your belt’s exact splice drawing and materials list where provided.
-
Square, mark, and secure the belt
- Square the belt end using a centerline and a framing square. Mark a clear centerline across several feet of belt on both sides of the planned splice. Secure both ends with clamps/come‑alongs and support the belt so the working area is stable and at comfortable height. Mark the bias line (commonly ≈0.3 × belt width) if your geometry requires it. Transfer alignment marks on both edges so you can see shift instantly.
-
Skive plies and prepare surfaces
- Strip covers and skive the plies according to the splice drawing. Maintain uniform step lengths or finger geometry using templates and a sharp blade. Grind lightly to expose clean fabric, then solvent‑wipe and allow to dry fully. Moisture, oil, or dust here is a guaranteed defect later. Confirm the finished skive levels are flush and free of glazing. Measure thickness and record.
-
Assemble the splice — hot vulcanized branch
- Apply uncured tie gum in the steps and fill any voids. Layer uncured cover rubber strips where specified. Stitch from the center outward to exclude air. Build edges slightly thinner than the unspliced belt to reduce extrusion. Load the assembly into the press with platens fully covering beyond the splice on all sides.
-
Assemble the splice — cold vulcanized branch
- Mix adhesive per the technical data: for SC4000, 660 g cement to 30 g E40 hardener (≈4% by weight), stirring for at least 3 minutes until homogeneous. Observe a 2‑hour pot life. Prime both bonding surfaces as specified, allow full flash‑off (check with a light knuckle‑tack—tacky, not wet), then carefully bring the joint together with alignment marks matched. Stitch progressively from center to edges in multiple passes.
-
Cure, cool, and unload
- Hot splice: Bring the press smoothly to temperature and pressure and hold for the calculated time. Typical fabric‑belt guidance from the REMA manual is 300°F ± 5°F (≈149°C ± 3°C) and 100–125 psi (≈6.9–8.6 bar) of surface pressure, with a curing time of about 5 minutes per 1/16 in (1.6 mm) of belt thickness, minimum 30 minutes. Maintain pressure during controlled cooling before releasing the press.
- Cold splice: Respect the adhesive’s early‑strength curve. After thorough stitching and cover‑strip installation, allow undisturbed cure per the bonding procedure and ambient conditions. Avoid shock loads during early life.
-
In‑process QA gates
- Pre‑cure: Confirm alignment within tight tolerance (e.g., centerline within a couple of millimeters across width), correct step/finger placement, adhesive mix and flash‑off verified, clamps tensioned evenly, and thickness checks recorded.
- In‑press (hot): Verify platen temperature stability near 300°F (149°C), pressure in the 100–125 psi band (heavy fabric belts may call for the upper end), and time per thickness has started once setpoint is reached. Log readings at intervals; watch for rubber extrusion at edges that suggests over‑pressure or uneven build.
- Post‑cure/post‑assembly: Inspect for flatness, no voids or blisters, clean edges, and uniform thickness within reasonable tolerance of the parent belt. Dress edges if required without cutting into structural plies.
Post‑Splice QA and Commissioning
Run the splice like you intend to run the plant: gradually and with eyes open. After the press is removed and surfaces are cool to touch (hot) or after the specified ambient cure window (cold), perform:
- Visual and dimensional checks: The splice should be flat, steps or fingers indistinguishable by touch, and thickness within about ±10% of adjacent covers unless your spec states otherwise. Confirm edge alignment with a straightedge and your transfer lines.
- No‑load tracking test: Run for 30–60 minutes, watching cleaners and skirt seals for interference. Adjust tracking if required. Then build load gradually. For general commissioning habits and belt care, many teams reference documents like the Goodyear Belt Maintenance Manual.
- Tension re‑check: Verify and document belt tension per conveyor OEM after thermal stabilization; re‑check within 24–72 hours.
A quick question to ask the crew during run‑in: “If this splice were to fail, what sign would we have seen 10 minutes earlier?” Make the answers part of your inspection routine.
Troubleshooting Quick Reference
Below are common symptoms you may encounter after a splice and practical responses.
| Symptom | Likely cause | What to do |
|---|---|---|
| Bubbles or soft spots | Air entrapment; incomplete flash‑off; contamination | Stop, open locally if possible, re‑clean, allow full flash, restitch. For hot splices with widespread voids, plan a re‑splice. |
| Step visible or ridge at edge | Uneven build‑up; wrong edge bar thickness; mis‑skive | Dress lightly if cosmetic; otherwise re‑cut with correct step lengths and rebuild. |
| Splice drifts or belt mis‑tracks | Centerline off; unequal tension; biased geometry | Re‑square, check transfer marks, adjust tension/tracking; in severe cases, cut out and re‑splice. |
| Cover cracks near splice | Over‑cure or thermal shock; incompatible rubber | Verify press calibration; follow belt maker’s cure table; avoid quenching; confirm material compatibility. |
| Early adhesive failure (cold) | Wrong mix ratio; expired pot life; high humidity | Mix to 660 g : 30 g (cement:hardener) for SC4000; work within 2 hours; keep 50–104°F (10–40°C) and low RH. |
| Steel cord print‑through or poor adhesion | Cord spacing/strip thickness off; solvent trapped | Relay cords per diagram; maintain ≥4× cord diameter spacing where specified; ensure complete solvent evaporation before layering. |
For a deeper dive into failure signatures and methodology, engineers often consult Beltcon technical papers like the 2025 perspective on splice methodology and failure analysis found in the Beltcon proceedings on splicing methodology.
Example Workflow
Here’s a neutral example of how a maintenance team might plan the job. A quarry schedules a hot vulcanized step splice on a textile belt during a weekend outage. They pre‑stage a calibrated press, uncured tie gum and cover strips, alignment tools, and a stitched‑rubber build‑up plan. After LOTO, they square and mark the belt, skive to the drawing, and log pre‑cure QA checks. The press is brought to approximately 300°F (149°C) and about 110 psi (~7.6 bar) once setpoint is reached; pressure is held through curing and cooling. On Monday’s restart, they run no‑load for 45 minutes, then ramp load and re‑check tension the next day. A similar workflow can be followed on belts supplied by بيسونكونفي, provided the crew adheres to the specific splice diagram and cure table for that belt family.
References and Further Reading
- Practical curing temperatures, pressures, and build‑up techniques for fabric belts are detailed in the REMA TIP TOP hot splicing manual for fabric belts (manufacturer manual).
- Adhesive mixing ratios, pot life, and environmental limits for cold bonding are outlined in the REMA TIP TOP SC4000 bonding procedures (technical information sheet).
- Finger and step geometry guidance for straight‑warp and two‑ply belts can be found in the Fenner Dunlop UsFlex finger and step splicing guide (manufacturer instructions).
- Steel cord splice essentials, including cord handling and strip placement, are covered in Semperit’s steel cord belt splicing instructions (manufacturer instructions).
- Commissioning habits and post‑splice care are discussed in the Goodyear Belt Maintenance Manual (reference manual).
- Safety requirements for servicing conveyors are set by OSHA’s Lockout/Tagout standard 29 CFR 1910.147 (U.S. regulation).
Notes on units and conversions used above: 300°F ≈ 149°C; ±5°F ≈ ±2.8°C. 100 psi ≈ 6.9 bar; 125 psi ≈ 8.6 bar. 1/16 in ≈ 1.6 mm. These are provided for field convenience; always prioritize your belt maker’s specification tables over generic ranges.